How to Setup Google Tag Manager
Introduction
As businesses continue to expand their online presence, the need for efficient data tracking and analysis has become increasingly paramount. With the prominence of online marketing strategies, having a reliable system for managing web tags has never been more crucial. Google Tag Manager emerges as a leading solution, offering a user-friendly interface that enables website owners to effectively add and manage tags without the requirement for extensive coding expertise.
Navigate to https://tagmanager.google.com/#/home
Click “Create Account”

Click the “Account Name” field and give your account a name.

Click this dropdown and select a country of your choice.

Click the “Container name” field and give your container a name. Click “Web” option.

Click “Create”

Accept the terms and conditions

Click “Yes”

Click here to copy tag and paste it to the <head> of the page(s).

Click here to copy tag and paste it to the <body> of the page(s), then click “OK”.

Click “Submit”

Click the “Add a descriptive name” field to give a name to this version. You can also add a description but it’s not necessary.

Click “Publish”

Click “Close screen”

View your active tags.

Conclusion
In conclusion, setting up a new account and container in Google Tag Manager is a pivotal step in enhancing the efficiency and accuracy of data tracking and analysis for online businesses. By following the outlined steps and best practices, users can establish a robust tag management system that caters to their specific requirements and objectives. With the comprehensive features and user-friendly interface offered by Google Tag Manager, businesses can streamline their data tracking processes and gain valuable insights into their online performance.
Unlocking the Secrets of Top-Performing Pre-Construction Landing Pages
As a landing page maven with a decade’s experience under my belt, I’ve seen the ups and downs, the hits and misses, and the factors that convert mere visitors into committed customers. After extensive research of over 20 competitors’ pre-construction landing pages, I’ve distilled some golden nuggets that make these pages stand out, rank on Google, and convert effectively. Let’s dive in.
The Best Call-to-Action Buttons for Pre-Construction Landing Pages
In the world of real estate and development, pre-construction landing pages play a pivotal role in attracting potential buyers or investors. This early-stage promotion is crucial, and the centerpiece of your conversion strategy is often the call-to-action (CTA) button. Crafting the perfect CTA for a pre-construction landing page can significantly increase your conversions. Let’s dive into the most effective CTAs for this niche:
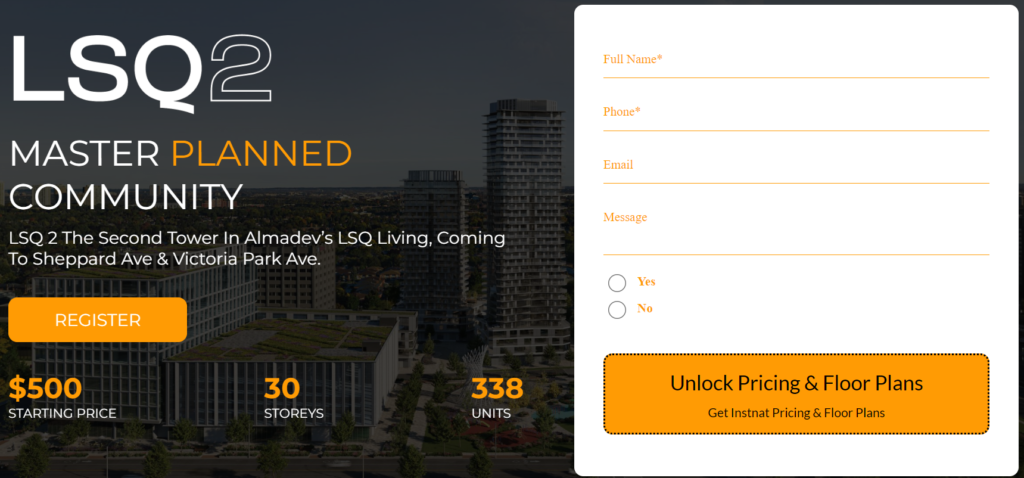
To dummy it down, a call to action is that button that asks your clients to do something. Like “Download Brochures“, “Unlock Pricing Plans” and “Register Now“.

In the example above, the orange button is the call to action button.
Understand Your Audience
Before we jump into the best CTAs, remember the golden rule: know your audience. We have tested it all and this is what works best for us.
1. “Register”
This is the most simple and one of the best CTA’s. It encourages website visitors to sign up or provide their contact information to express interest in a forthcoming real estate development or construction project.
2. “Secure Your Spot”
Pre-construction implies exclusivity. There’s limited availability and early bird benefits. “Secure Your Spot” creates a sense of urgency and taps into the fear of missing out.
3. “Get Early Bird Pricing”
Everyone loves a good deal. This CTA not only suggests a discount but also reinforces the idea that acting now has its perks.
4. “View Floor Plans”
A tangible step towards visualizing their potential investment or home. This CTA is particularly effective when paired with high-quality images or virtual tours.
5. “Join the VIP List”
This gives an air of exclusivity. Being a part of the VIP list could mean early access, exclusive updates, or special pricing.
6. “Reserve Now, Pay Later”
For those hesitant to invest immediately, this CTA offers a low-commitment way to show interest. It assures them they can indicate their interest without immediate financial obligations.
7. “Discover the Amenities”
Luxury projects often come with state-of-the-art amenities. Entice potential buyers or investors by allowing them a sneak peek into these features.
8. “Book a Virtual Tour”
In today’s digital age, and especially post-pandemic, virtual tours have gained immense popularity. This CTA offers a convenient and safe way to explore the property.
9. “Connect with a Specialist”
Provide an opportunity for potential buyers or investors to speak directly with an expert. This can foster trust and provide answers to specific questions.
10. “Download Brochure”
A digital brochure can provide all the details in one comprehensive package. This CTA not only offers value but also allows you to gather email addresses for further marketing.
Design Matters
While the text of your CTA is crucial, the design can’t be overlooked. Ensure the following:
- Contrast: Your button should stand out but not clash with the overall design.
- Size: It should be prominent but not overwhelming.
- Position: Place it above the fold, ensuring visitors see it without scrolling.
- Mobile Optimization: Ensure your CTA looks great and functions well on mobile devices.
Final Thoughts
Crafting an effective CTA for a pre-construction landing page requires a mix of understanding your audience, offering tangible next steps, and incorporating design best practices. By combining compelling text with an eye-catching design, you’ll set your landing page up for success. Remember, the goal is to make the path from interest to action as seamless as possible.
Xhulio Vasiu
CEO/Founder
(647) 781 0437
How to Send Mass SMS on Instahub
SMS marketing can be an effective way to engage with your audience. Follow these steps for a successful mass SMS campaign.
How to Add or Import your Contacts
Intro
Once a contact has been added to the Customer Relationship Management (CRM) you will manage and foster your relationship with the customers. You will have better control of your clients or leads, send bulk emails and see the stats of those Emails.
How to Add Contacts:
Step 1: On the left-hand side menu click on ‘Contacts‘.
Step 2: Click on the ‘+‘ sign to add your contacts.

Step 3: Fill in the contact details on the pop-up Modal Form and click ‘Save‘ as shown in the image below.

How to Import Contacts:
Step 1: Click on ‘Contacts’ on the left main menu.
Step 2: Click on the ‘Import Contacts’ button, the arrow pointing up on the center menu.

Step 3: You can drag and drop the CSV file with your contacts or click on the ‘upload’ and click ‘next‘.

Step 4: Map the unidentified fields as required, (if any) as shown in the example below. Click ‘Next‘.

Step 5: Give the import a relevant import name. Click ‘Submit‘ to complete the import process.

Please watch the video below:


